Tardigrade Outdoors
  • Home
  • MaskUp San Jose
  • Trip Reports
  • Backpacking Articles
  • Blog
  • Links
  • Contact

Universal De luxe Zig Zag Sewing Machine

7/3/2013

10 Comments

 
In what I am sure to be my least interesting post ever, I just picked up a new sewing machine that I am actually pretty excited to get into service. It's a Universal De Luxe Zig Zag MZB.
Picture
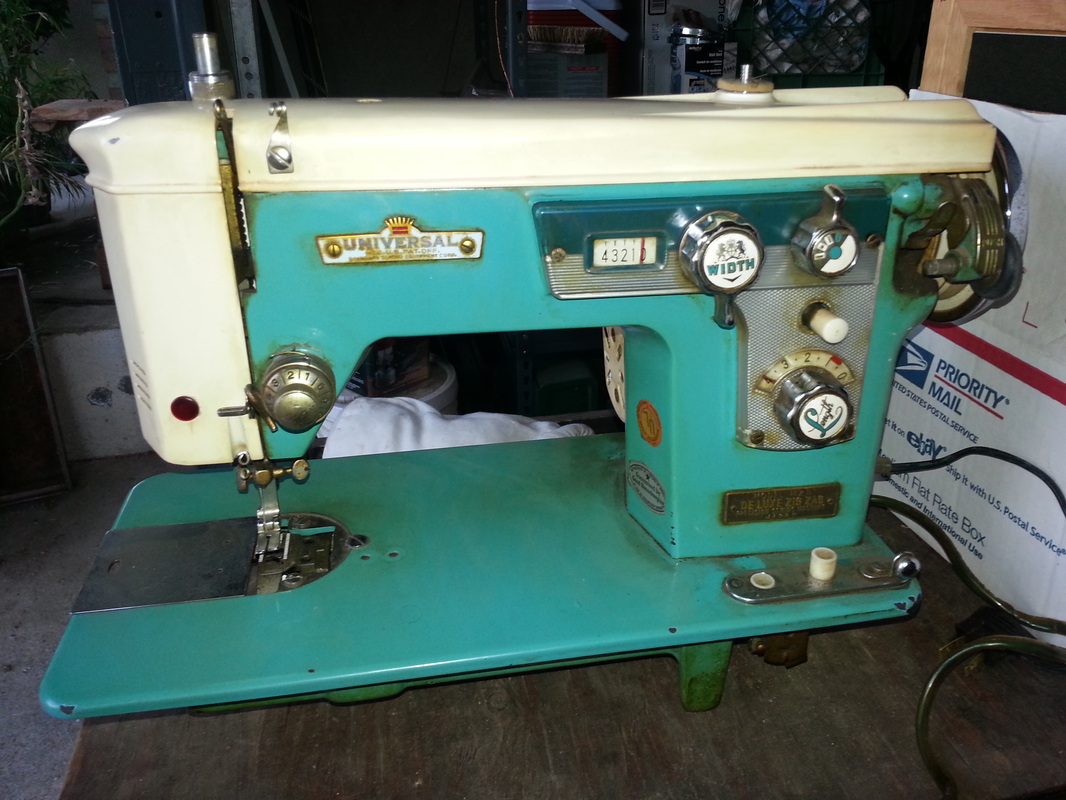
I'm mostly firing on a Consew 226, but I need a smaller workhorse to handle all the little bits and whatnot better than my other one, which is missing pieces and the Singer CE-200 which I only want to use for embroidery. I hope this will do it well.

Read More
10 Comments

Building a bear-proof composter in Yosemite National Park

6/24/2013

2 Comments

 
I lived in Yosemite National Park for over eight years. I climbed a lot, backpacked a lot, but I was also able to pursue many projects that I thought up.

One of these ideas was a bear-proof composter for myself and other residents. I didn't have much support from NPS or the concessionaire, the company that runs the lodging and dining in the park, so I had to be creative. I couldn't find mention of a composter like this having been made before, so I didn't have much of a reference. I looked over the web and talked to a bunch of people, but nothing really materialized until I went to the dump one day. A bunch of old bear proof trash can pieces were being thrown away. My solution began to solidify.

Read More
2 Comments

The Greatest Backpacking Mug That Ever Lived

6/1/2013

0 Comments

 
The simple, insulated, lightweight coffee mug pictured below is one of my favorite pieces of equipment. I've had the same type for about two decades. It's served me better than any other. It weighs about 4 1/2 oz and keeps my coffee warm without burning my lips just about anywhere. I'll generally store in an outside pocket of my pack, upside down to keep debris out. It's always ready for a break and some Iskate while we're traveling.

It's also very durable and inexpensive. Until the Nomad Ventures website is back up, I'd suggest buying it from Campmor.


0 Comments

Grape trellises from old grape stakes and reclaimed wood

5/31/2013

2 Comments

 
At Ardeth backpacking gear, we love grapes and we love grapevines. We love how they provide food, how they look, we love the shade and the little ecosystems they create. So, we've been planting a variety of grapevines around our home so we can have our own, veganic and organic grapes.

Our overall plan with our new home was to buy an inexpensive home with a large yard. We have to keep our bills low to start the business, and growing our own food helps us to do that and to become more sustainable. Grapevines can be a part of that.
We get a variety of foods from grapes. Not only do we get fresh, delicious, veganic grapes, but we also get raisins, grape syrup, grape jam, and this year we might even try our hand at making wine.
Here is a little gallery of photos that inspired us. This grapevine is in Tulare and we just thought it was too awesome. Click on any photo to open the gallery and navigate with the arrow keys.
We're started our first grapevines along our southwest wall to produce grapes and to help shade the house from the summer sun. In the winter, the grapevines are dormant, so we still get the winter sun to warm the house.

I built it with 2X4s and concrete reinforcing grid. It's been working out very well. Underneath it, we planted strawberries. Lawn care is obviously not a priority. Give me a break, I'm building sleeping bags.

Phase 1 grape trellis. Click on any photo to open the gallery and navigate with the arrow keys.
The second phase was to continue getting different kinds of grapevine starts and to establish vines along the sunny southeast corner of the house. Small trellises would link and, as the vines grew, we'd build an arbor over the area. This would be the third phase. Presumably, we would be able to wait a year or two until we need to build the arbor. No, I am not a carpenter.
Phase 2 trellises. Click on any photo to open the gallery and navigate with the arrow keys.
The key to saving money on this endeavor was all of the free grape stakes that I was able to get on Craigslist. After I brought them home, I took some time to figure out how I could best utilize them. What I really wanted was 1/2" stakes.
Ripping the 2"X2" ancient redwood grape stakes into 1/2" stakes was not so simple, but I built a jig that allow me to safely rip into 1/2strips. For the taller trellises, I ripped the 2X4s that I got for free last year and have been sitting in my resource sequestration depot. The resource sequestration depot has also been unflatteringly referred to as "the junk pile" by my doting wife.
I ripped the 2X4s into 1/2" X 1 1/2" strips in two stages. Then, I laid out a template on the workbench (an old door) and screwed and glued them together. I placed the surfaces that I wanted facing out down, as the screws were going to be on the upper surface, facing toward the house once the trellis was built.
I drove stakes into the ground and mounted my trellises to them.
They really didn't turn out looking as nice as I had hoped, but I change things around a bit in the winter when we prune the vines.
Building the trellises. Click on any photo to open the gallery and navigate with the arrow keys.
2 Comments

Instant, indestructible, nearly free, homemade drawcord threader

5/27/2013

0 Comments

 
Not being so delicate with my equipment, I broke the drawcord threader. Looking closer at it, I realized there was no way this thing was going to last long anyways. I looked around on the net for a more durable replacement, but it just wasn't happening.

So, I went walking around Ardeth backpacking gear's compound to mull it over, and in the garage, I realized that the trimmer cord we had for the weed wacker would do just perfectly.

I cut off about a meter long piece and used one of my propane-powered mini torches and a pair of Kleins to shape loops on the ends.

Instant, indestructible, nearly free, drawcord threader!
Picture
0 Comments

On positioning slippery nylon fabrics in sewing machines

5/23/2013

0 Comments

 
All of our attention lately has been getting our first product lines ready for sale. Horrifically, this means no backpacking.
I've also been thinking that I want to share some of what I have been learning about sewing these lightweight, slippery fabrics. Bear with me, I've only been sewing for a couple of years and it's nearly all been on Ardeth products.
I don't pin. I don't even pin, then remove the pins as I am sewing up to them. But, I do pin to set up my pieces.
A quick pin at my starting location helps to keep the slippery nylons that we work with in place until I can get a few stitches in, but after that, I remove it.
Granted, I am usually on my needle-feed machine, so that helps greatly.
Picture
Picture
0 Comments

Locally made flatbread makes a great pizza.

5/20/2013

1 Comment

 
Picture
Picture
In our town, we have these local yardsale Facebook pages where people sell the stuff piling up in their garage or handmade crafts and whatnot. You might be able to find something similar by doing a search in Facebook for groups that are in your town.

One local woman started selling the flatbreads that she was baking. We ordered a couple after confirming that they did not have any animal products in them. These flatbreads are so good, we wanted to eat them right away, but the flatbreads are about 12" in diameter and would make perfect pizza crusts! We piled up our favorite toppings and threw them into the oven at 400°F for 15 mins on the middle rack. They came out so great! Homemade pizza crust, some marinara sauce, Daiya cheezy topping, mushrooms, olives, and garden-fresh kale and onions.
These turned out to be a delicious, easy, wholesome, and inexpensive dinner. This could easily become a weekly treat!
1 Comment

Embroidering onto lightweight nylon fabrics

5/18/2013

0 Comments

 
Picture
Picture
Here are a bunch of samples that I was working on - different images, stitch densities, and whatnot.
We've been embroidering the Ardeth backpacking gear logos onto our sleeping bags, backpacking quilts and backcountry blankets, but stabilizing lightweight fabrics has been a challenge.
On the left, is 1.1 oz. ripstop as backing, which does not work very well. It's too slippery for the hoop. On right is commercial stabilizer, which is very heavy, stiff and painfully obvious in the finished product. On the bottom is the PrimaLoft One scrim that I remove before quilting the insulation. It's firm, sticks well in the hoop and very light. Not noticeable in the finished product.
I discovered that I can use my millions of yards of unused Primaloft One scrim as the perfect backing. Works better than anything else I've tried in the last year. I did six tests while testing various designs and they all came out great!
-Jason
0 Comments

Cutting lightweight nylon fabrics.

5/17/2013

0 Comments

 
Cutting lightweight fabric panels for specialized sleeping bags and quilts can be tricky.

Here is a panel of Primaloft One insulation that we quilt in-house with a custom made rig. We're sewing this panel into a Cathedral backpacking quilt. But cutting nylon with a knife or scissors leaves ends that can fray and weaken the stitching. Cutting with a hot knife not only seals the edges of the fabric, but also bonds multiple layers of material together, making our stitching more precise.

Some of the tools we employ to cut panels like this are:
Butane powered hot knife.
Steel sheeting.
Door thresholds.
Magnets (also good for holding down curves).
Various pieces of metal from the backyard junk pile. I mean, "resource" pile.
-Jason

Picture
Picture
0 Comments

8th North Rim sleeping bag prototype completed

4/30/2013

0 Comments

 
We are very proud to announce that we've completed our 8th prototype for the North Rim series of sleeping bags.

The American-made North Rim series sleeping bags have been meticulously designed for the adventure backpacker who demands a comfortable and cozy night of sleep no matter where they end up.

We expect to have the North Rim series of sleeping bags ready for sale beginning June 1st. for $440.00 USD. They will feature right and left zip models in medium and tall sizes.
 (beta) Specifications:
  • comfortable to 35°F
  • 1lb. 8oz. (680g)
  • made with Primaloft One™ insulation and 1.1 oz. ripstop nylons
Key design elements:
  • insulation eliminated from bottom of bag; bag mates with sleeping pads
  • engineered for side, knee-up, or belly sleeping
  • mates to other North Rim series bags
  • exclusive Ardeth-designed Omni Battens
  • exclusive Snufflelufugus shoulder cargo baffle
  • 1/4 zipper, in addition to full zipper expands temperature range
  • intended to mate with any 20" wide sleeping pad
  • HotBox compatible, creating a super-warm den for users with especially cold feet
  • designed and made in the USA
Picture
Sleep comfortably on your side, with a knee up, or on your belly.
Picture
Ardeth's exclusive Omni Battens allow layering of a Cathedral Quilt or clothing, integrating them into your sleep system.
Picture
A second, chest length zipper expands the North Rim comfort range
Picture
Our Snufflelufugus shoulder baffle also holds and small gear you'd like to keep at hand
Picture
Ardeth designed our miniature Omni Battens to be ultralight and indestructible, but still easy to use in the middle of the night
Picture
Keep even warmer without the added weight by attaching a rain jacket with our Omni Battens
Picture
Primaloft Oneā„¢ insulation offers exceptional drape, reducing cold pockets of air in the bag
Picture
Snug up with our hood drawcord
Picture
warm, lightweight and highly compressible - and this is only a stuff sack
0 Comments
<<Previous
Forward>>

    The Tardigrade Outdoors blog

    Our repository for whatever we are doing.

    Archives

    May 2021
    June 2020
    November 2019
    October 2019
    September 2013
    July 2013
    June 2013
    May 2013
    April 2013
    January 2013
    December 2012
    July 2012
    June 2012
    May 2012
    April 2012
    March 2012
    February 2012
    January 2012
    December 2011
    May 2010

    Categories

    All
    Animal Rescue
    Backpacking Food
    Backpacking Gear
    Building Backpacking Gear
    Building Gear
    Day Hiking
    Dehydrating Food
    Development
    Gardening
    Gear
    Kayaking
    Random
    Sleeping Bag Testing
    Trip Preparation
    Trip Reports
    Wildlife
    Yosemite

    RSS Feed

Powered by Create your own unique website with customizable templates.