Tardigrade Outdoors
  • Home
  • MaskUp San Jose
  • Trip Reports
  • Backpacking Articles
  • Blog
  • Links
  • Contact

How to print without a USB cable on an Ender 3 and OctoPrint.

11/28/2019

17 Comments

 
Note: I'd consider this post to be depreciated, please read the newer post instead.
Ender 3 no USB cable
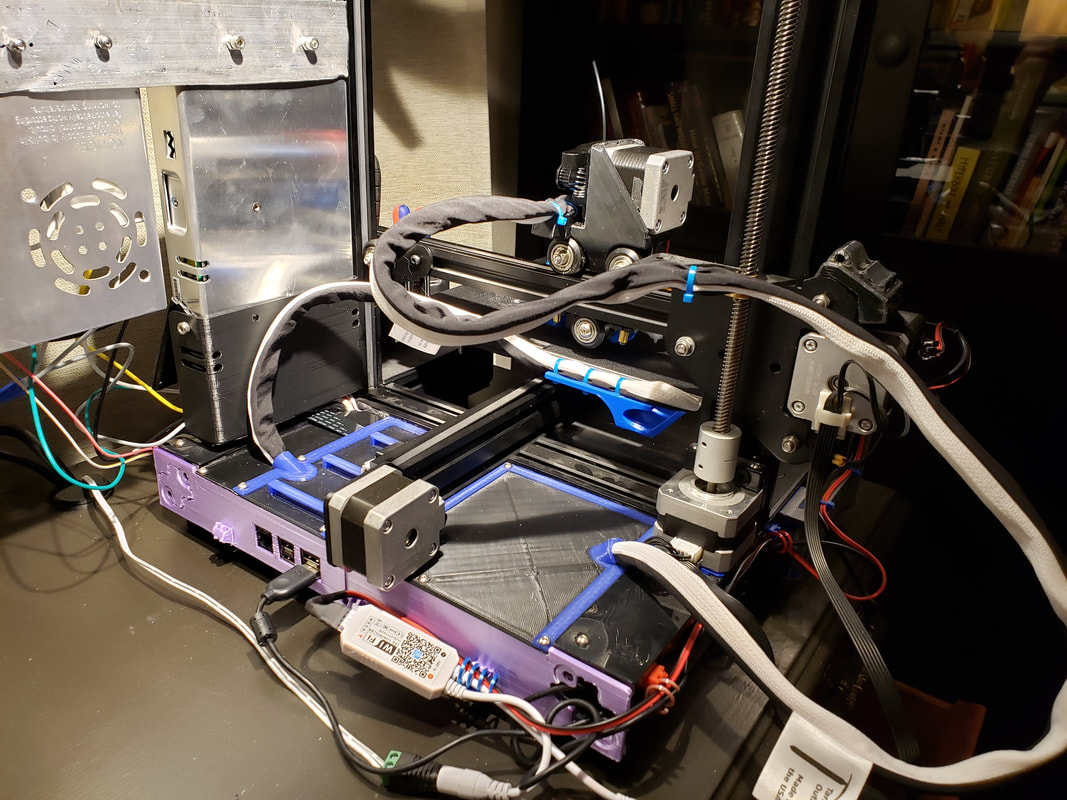
Thanks to tip from Reddit user u/FDL1, I looked into removing the USB cable from my Ender 3 3D printer. This is what I found and how I did it.

It was easier than I thought. One needs to have already upgraded to OctoPrint and have installed an aftermarket printer board.

​This "how to" will cover the MKS gen L. We'll be modifying the Raspberry Config file on the Raspberry PI, and we'll need three wires, about 6" long with female DuPont connectors on either end.

Needed:
OctoPrint already setup and working (https://octoprint.org/)
MKS gen L printerboard already configured and working (https://smile.amazon.com/gp/product/B07R6RN78Y).
Three 6" (152mm) wires with female DuPont connectors on both ends (https://smile.amazon.com/gp/product/B07RN4WN2N).
The ability to modify the Raspberry PI's config file (https://www.makeuseof.com/tag/edit-boot-config-file-raspberry-pi/).

1) I started by disconnecting power and removing the USB cable and accessing the Raspberry PI (RPI) and MKS gen L printer board. If you don't disconnect power, you may shock yourself or damage your equipment.
2) I then labeled and connected the three 6" (152mm) wires that will replace the USB cable. They connect the RPI with the MKS gen L. I'm an electrician and a little trick we like to use is a number (or letter) book: (https://smile.amazon.com/3M-ScotchCode-Pre-Printed-Wire-Marker/dp/B00DDEID36). EDIT: I hate how expensive these are! But, I use leftover ones from work.

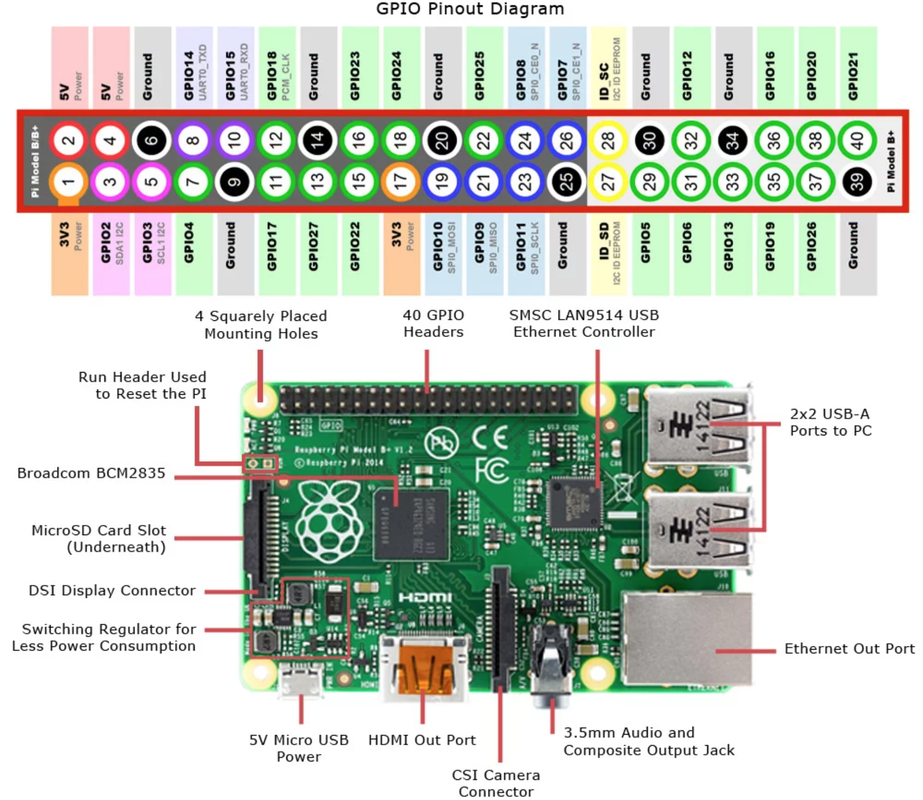
 I'm starting to do a lot on my RPI, so I'm labeling the pin numbers on my wires. On the RPI, I used pins 8: TXD (data send), 9: ground, and10: RXD (data receive).
Picture
Picture
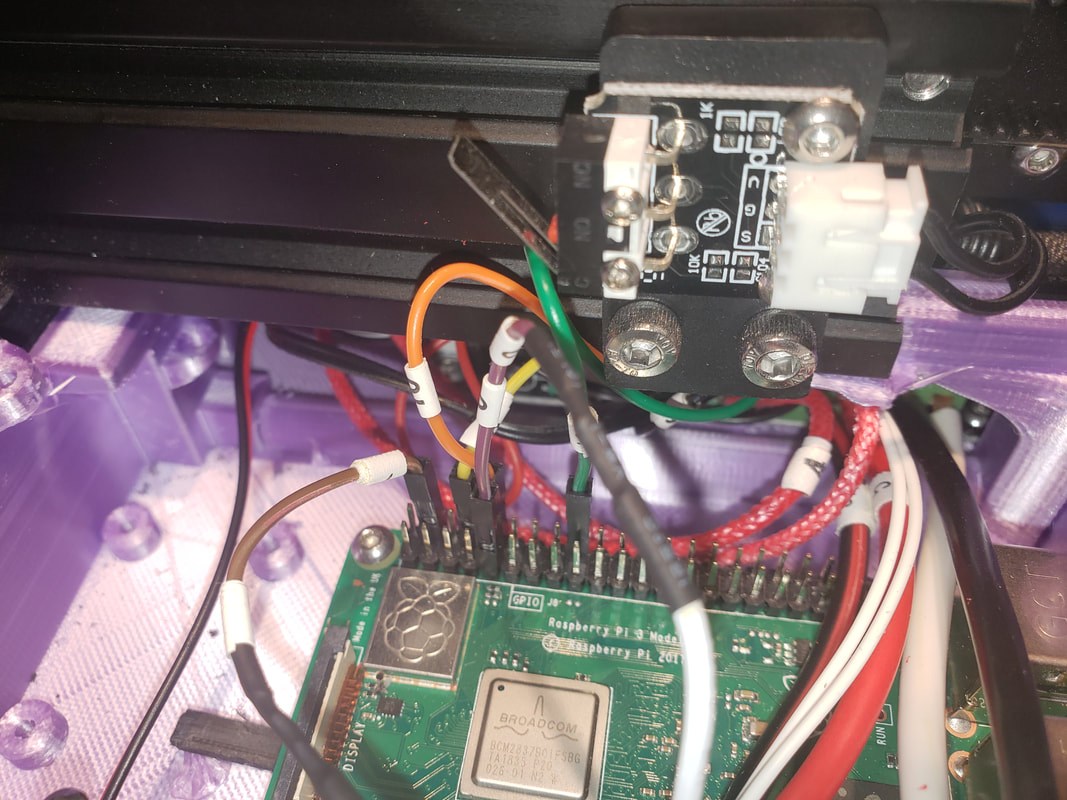
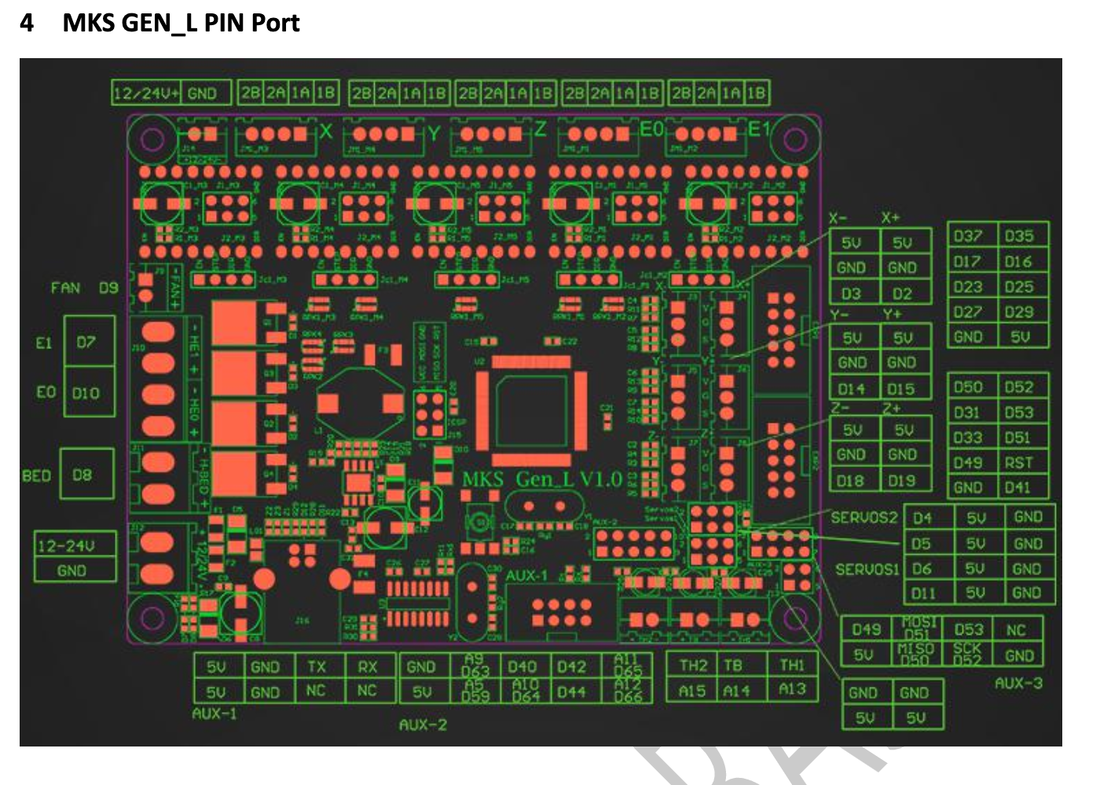
3) I connected these wires to pins in the AUX-1 header.
RPI pin 8 (data send) to MKS gen L RX (data receive). 
RPI pin 9 (ground) to MKS gen L GND (ground).
RPI pin 10 (data recieve) to MKS gen L TX (data send).
Picture

4) Then, I powered up the RPI and accessed the config file. Information on how to access the config file can be found here: https://www.makeuseof.com/tag/edit-boot-config-file-raspberry-pi/.

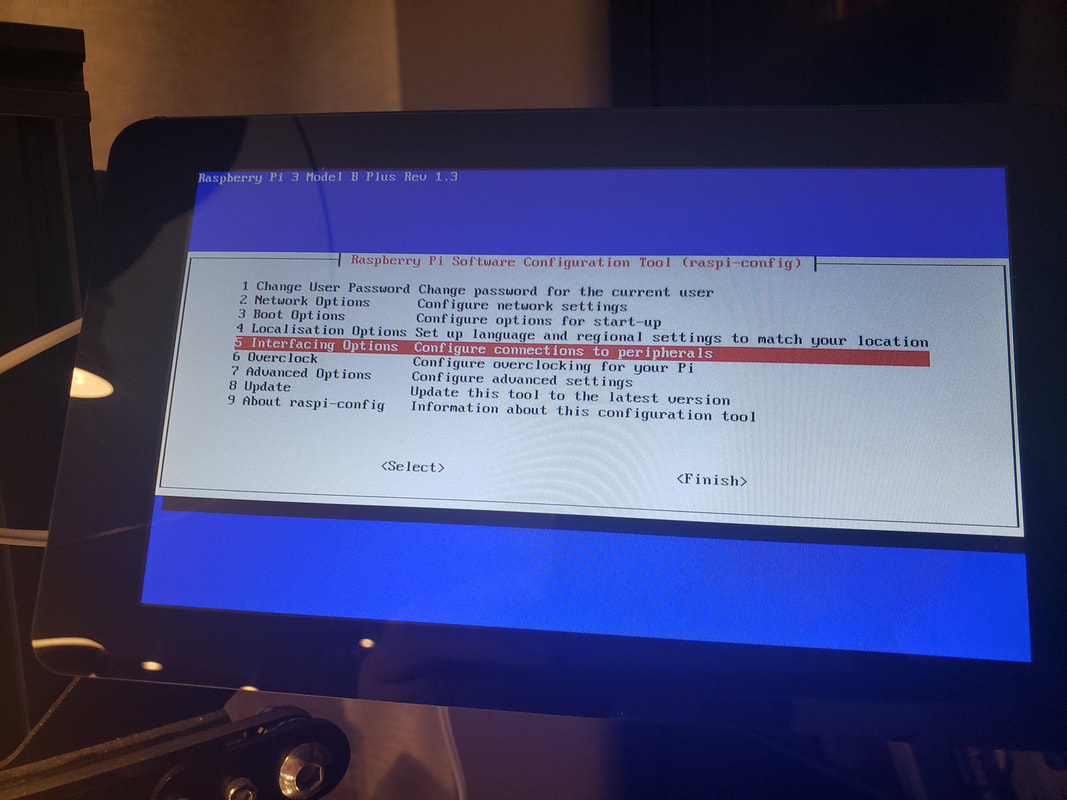
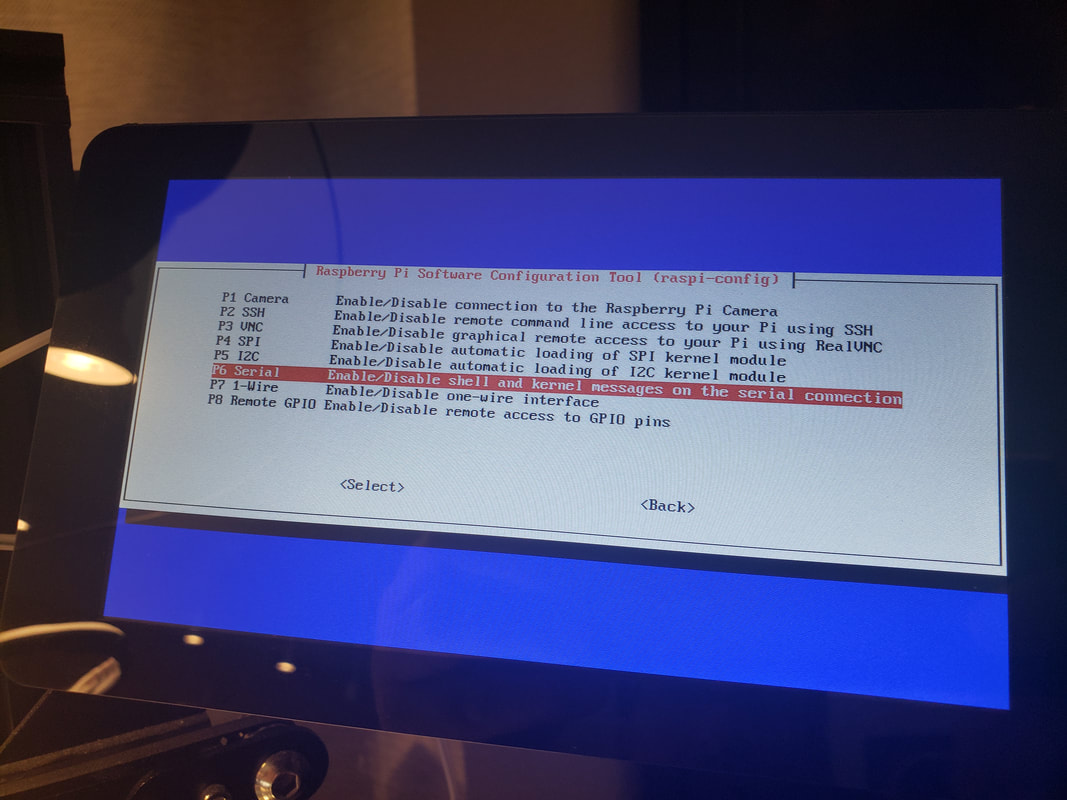
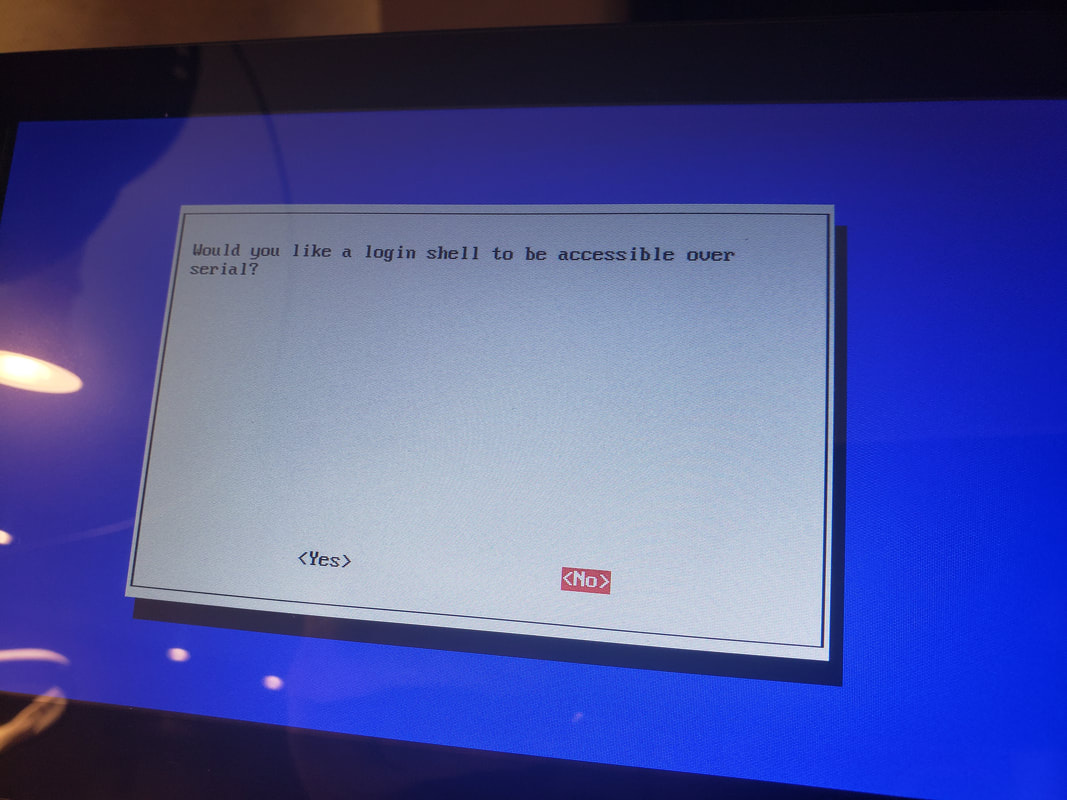
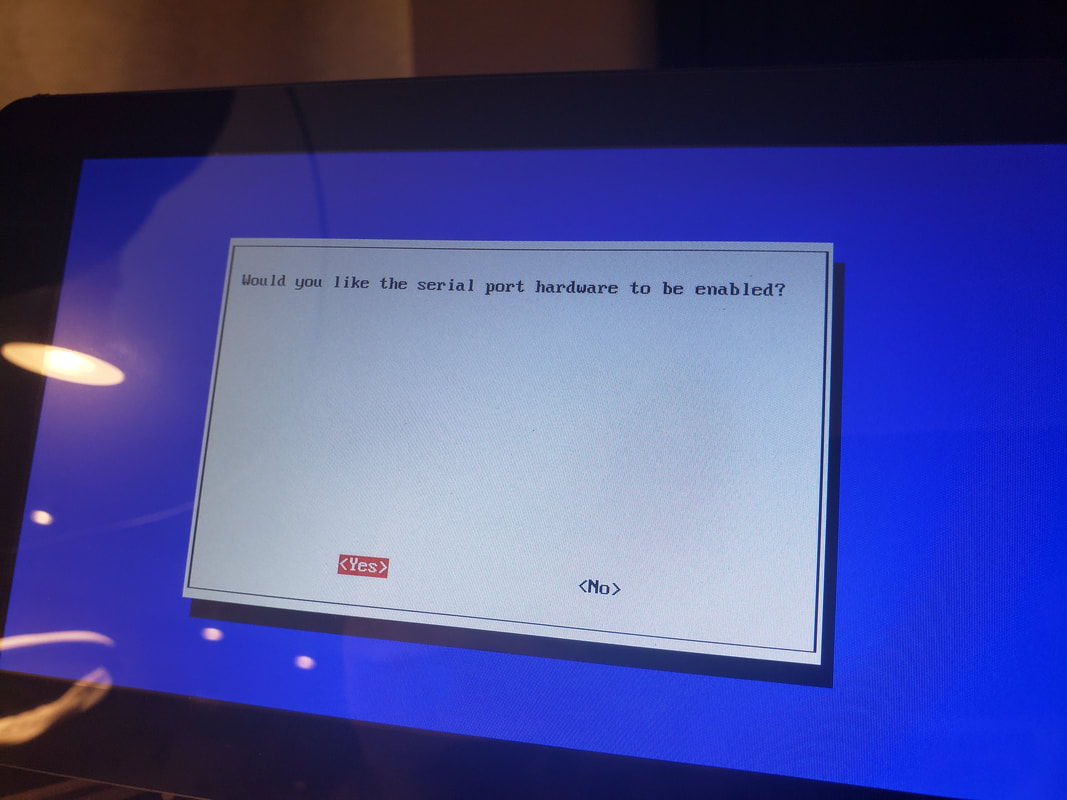
I navigated the config file thus: 
Select Interfacing Options,
Select Serial,
Select No to login shell over serial,
Select Yes to serial port hardware to be enabled.​
Picture
Picture
Picture
Picture

 I then rebooted, closed everything up, and powered up my printer.


4) In the OctoPrint interface on my computer, I accessed the OctoPrint menu, activating the new serial port by:
clicking the OctoPrint spanner,
clicking Serial Connection,
clicking General,
adding "/dev/ttyS0" to the Additional serial ports box.
I then Saved, closed, and returned.
Then clicking  on "
/dev/ttyS0" in the Serial Port drop down menu. 
I hit Save again and closed the tools menu.
I selected "Restart OctoPrint" from the power menu and restarted Octoprint.

When it reloaded, I looked for "/dev/ttyS0" in the Connection window. I selected it and hit "Connect".

Disco.
I tried to be really clear and keep it simple. I hope I helped you!
17 Comments
Thundrfuk
4/20/2020 03:56:11 pm

Absolutely awesome! Great write up, easy to follow and clear. I had been on the hunt for a short usb cable when I came across this, well no more usb cable at all. Thank you.

Reply
Jason
4/20/2020 04:20:23 pm

You're welcome. I'm glad this helped.

Reply
Dez Hoyle
4/23/2020 07:23:46 am

Thanks 8FootedAlgaeEater, I am using your Ender 3 rear case from thingiverse (Iv'e made slight mods, mainly to the lids). Absolutely Love it btw. Im yet to put my m/board into the rear case but thats next on the list after i buy an after market board. As for labeling the cables and wires i use a Brother p-touch D400 for everything. It has special settings for labeling cables and new cartridges are v-cheap. Maybe not quite as good as those plastic sleeves you use but a lot cheaper.

Reply
Jason
4/25/2020 01:31:04 pm

I'm glad you're finding the model and information useful. I'm going to check out the Brother printer you suggested, it looks better than what I am using. I'm also in the process of upgrading my MKS GenL to a SKR 1.4 Turbo with a RPI 4B+. I'll update the information here once I get it all set up and running.

Reply
Werfex
11/11/2020 06:25:49 am

Hi! Awesome idea! But i have some question. I tried that on my Anet A8, I connect all wires but still octoprint send me this error(No more candidates to test, and no working port/baudrate combination detected.) My USB on anet mainboard isnt working so i really need it. Help! btw. Sorry for my eng :P.

Reply
Jason
11/11/2020 08:13:58 am

I am unfamiliar with the Anet A8 mainboard. What board is it? If we can find a pinout for it, we may be able to find the right pins to connect to and update the firmware.

Reply
Werfex
11/11/2020 08:44:14 am

Its "Anet 3d v1-5". I was using this link http://anet-a8.blogspot.com/2017/11/3d-print-using-bluetooth-on-anet-a8-a6.html

Mark
1/5/2021 09:01:10 am

i've tried this 20 differnt times and cannot get it to work, I've got it to work on my SKR v1.3 board no problem with a different write up, but I cant get it to work on my MKS Gen L board... /dev/ttyS0 doesnt even show up even if i put it into the "Additional serial ports" box. On the SKR board i had to do extra steps on both the pi and marlin to get it to work....

Here's the link to the other guides that worked for my skr board so you can see what i'm talking about: https://community.octoprint.org/t/simple-3-wire-serial-connection-from-pi3-to-skr-v1-3-board/10166 (this one you have to read the comments to see where a few people got it to work)

You can also see in the SKV v1.3 user manual here: file:///C:/Users/Mark/Downloads/HWPCBBTTSKRV1.3%20-%202019%20Unofficial%20Instructions%20(3).pdf (starts on page 12) they show the 3-wire no usb cable solution too

My confusion is because it shouldn't really matter on the board side of it because its just TX, RX, and GND youre connecting to, and "should be" software side, probably either firmware or the pi itself

I'm running vanilla marlin on the MKS Gen L that i cannot get to work, just hoping maybe someone can help..

Thank you!

Reply
Mark
1/5/2021 09:02:18 am

I forgot to comment the box "notify me of new comments" so i'm just making this to alert me if anyone responds...

Reply
Jason link
2/2/2021 08:54:53 pm

Hi Mark,
I'm sorry for not getting back to you sooner.
It's tricky, it seems. There are so many details. I often find I make tiny mistakes and so I've been starting to write checklists for myself. I don't have any advice other than that. But, I'm about to do this process again for two Monoprice Select Minis that I just picked up. If I see something, I'll post it.

Miroff
1/17/2021 03:24:34 pm

Hi.
Good solution.
Is it possible to do same with stock board from Ender3?

Reply
NeoMatrixJR
1/20/2021 09:44:50 am

This explains where to find RX/TX solder pads on the creality main board: https://crosslink.io/2020/08/21/hacking-creality-mainboards-serial-port-breakout-explained/
WARNING: They're tiny....
It *should* be possible but I haven't tried it. Was just looking into this idea myself since I have my RPi and MB in a tray together now in the back... Would be nice to loose the USB cable. I'm not sure if I'm going to try this though or get a SKR board instead. I have to have a 100% working connection though as I'm running Klipper instead of stock firmware.

Reply
Jason link
2/2/2021 08:56:31 pm

That's cool. I would not have thought that it was possible on a stock board. And, thanks for helping Miroff out.

Dennis Gardner
5/12/2021 12:05:58 pm

Step 4 tripped me up and I'm hoping someone still watching this thread might be able to help.

The part in Step 4 asks "add "/dev/ttyS0" to the Additional serial ports box"

Well /dev/ttyS0 is already available from the connection drop down list; I'm pretty sure adding the same thing again isn't going to net any results.

So my question, after enabling the serial hardware and rebooting, how can I confirm the correct "/dev/*****" string to add to the Additional serial ports box?

Reply
Jason
5/12/2021 12:39:44 pm

Yeah, I should have clarified this. Add it if it isn't already there. I actually added it and it was already there, and it had no ill effect. If you see a double entry later in Octoprint, you can just delete one.

Reply
Dennis Gardner
6/17/2021 01:56:16 pm

So I did get this working on a 4.2.2 board.

On the 4.2.2 side, I tapped into the gnd, tx, and rx on the CH340G.
On the PI side, I connected to the same GPIO pins talked about in this article (obviously)

As for my initial issue, it can be a bit confusing to wrap your head around the serial denotations and symbolic links, especially because the different PIs implement the uarts differently.

To solve this confusion and figure out exactly what dev/tty* I was supposed to be using in octoprint for this new method of communication, I used a minicom on the pi to do a loopback test with the tx and rx gpio, this allowed me to confirm that serial communication was working and those pins correlated with dev/ttyS0 on my Pi 3B.

Jason Lucero
6/23/2021 03:20:58 pm

Hey Dennis, I'm replying to this comment because I cannot seem to reply to your last one. Thanks for writing about that loopback test. I don't fully understand it, but I'm going to Google it and learn what that is. I appreciate getting this opportunity to learn more about the Pi and these protocols.

Reply

Your comment will be posted after it is approved.


Leave a Reply.

    The Tardigrade Outdoors blog

    Our repository for whatever we are doing.

    Archives

    May 2021
    June 2020
    November 2019
    October 2019
    September 2013
    July 2013
    June 2013
    May 2013
    April 2013
    January 2013
    December 2012
    July 2012
    June 2012
    May 2012
    April 2012
    March 2012
    February 2012
    January 2012
    December 2011
    May 2010

    Categories

    All
    Animal Rescue
    Backpacking Food
    Backpacking Gear
    Building Backpacking Gear
    Building Gear
    Day Hiking
    Dehydrating Food
    Development
    Gardening
    Gear
    Kayaking
    Random
    Sleeping Bag Testing
    Trip Preparation
    Trip Reports
    Wildlife
    Yosemite

    RSS Feed

Powered by Create your own unique website with customizable templates.